RequestMapping
@Controller
@RequestMapping("/user")
public class RequestMappingUserController {
@RequestMapping("/list")
public String user_list() {
return "forward:/WEB-INF/views/user/list.jsp";
}
@RequestMapping("/view")
public String user_view() {
return "forward:/WEB-INF/views/user/view.jsp";
}
}
RequestMapping은 Get방식과 Post방식 관계없이 들어오는 모든 요청을 받는다.
기본적으로 맵핑은
메소드 위에 Annotation을 붙여 한다.
하지만, 위의 코드는 클래스 레벨에 RequestMapping하여 패키지 단위를 맵핑하였다.
예를들어
/user_list
/user_view
/guest_list
/guest_view
가 있다면
/list와 /view는 /user와 /guest를 반복하므로
user와 guest를 한번더 폴더링하여
/user/list
/user/view
/guest/list
/guest/view
로 맵핑하는게 더 관리하기 좋을 수 있다.
Get, Post Mapping
@Controller
public class RequestMappingController {
@GetMapping("/login")
public String get_form() {
return "forward:WEB-INF/views/form.jsp";
}
@PostMapping("/login")
public String post_login_action(@RequestParam(name="id") String id,@RequestParam(name="password") String password, HttpSession session) {
System.out.println("id param"+id);
System.out.println("password param"+password);
boolean isLogin= true;
if(isLogin) {
session.setAttribute("sUserId", id);
}else {
}
return "forward:WEB-INF/views/post_login_result.jsp";
}
}
@GetMapping("/login")
public String get_login_form() {
return "forward:WEB-INF/views/get_login_form.jsp";
}
GetMapping("/login")
Get방식으로 /login에 들어오면 get_login_from()이 실행되고 get_login_form.jsp 반환
get_login_form 에서는 아이디와 패스워드를 입력받고
Post방식으로 /login으로 다시 보낸다.
@PostMapping("/login")
public String post_login_action(@RequestParam(name="id") String id, @RequestParam(name="password") String password,HttpSession session) {
session.setAttribute("userId", id);
return "forward:WEB-INF/views/post_login_result.jsp";
}
PostMapping("/login")
위와 같은 /login으로 들어오더라도 Post방식으로 들어오면 post_login_action()이 실행된다.
같은 uri를 맵핑하더라도 메소드 이름은 달라야한다.
@RequestParam(name="id") String id
파라메터 식별자를 request 의 속성 key와 일치시키면 웬만하면 Spring이 파라메터를 잘 binding하지
그렇지 않은 경우 @RequestParam으로 명시할 수 있다.
위 메소드에선 session도 받아와 userId를 session의 속성에 추가하고 post_login_result.jsp로 forwarding했다.
@PostMapping("/user_join_form")
public String model_attribute_user_write_action(@ModelAttribute(name="user") User user) {
User user =new UserService().joinUser(user);
return "forward:WEB-INF/views/user_write_result.jsp";
}
request에 userId, password, name이 등록되어있다면
@ModelAttribute 어노테이션으로 User user 객체를 바로 가져올 수 있다.
스프링은 내부적으로
requestParam에 userId와 password, name을 가져와서
User user = new User();
user Setter() 메소드로 user에 데이터를 담아
user객체를 request.setAttribute("user",user); 로 담아 준다.
model_attribute_user_write_action()메소드 내부에서
user 객체를 사용하면 된다.
*request는 forwarding 할 때 동일 request를 그대로 가져가기 때문에
파라메타로 받은 user는 다음 액션이 forward 이라면 request나 model에서 "user"라는 키로 그대로 다시 꺼내올 수도 있다.
++model.addAttribute() 하면 request에도 자동으로 .setAttribute() 된다.
@PostMapping("/guest_write_action")
public String guest_write_action(@ModelAttribute Guest guest,RedirectAttributes redirectAttributes) throws Exception {
int guest_no=guestService.insertGuest(guest);
redirectAttributes.addAttribute("guest_no",guest_no);
return "redirect:guest_view";
}
RedirectAttributes
redirect 할 때 가지고 갈 파라메터가 필요할 때 사용할 수 있다.
redirectAttributes객체에 addAttribute 메서드를 사용해 guest_no를 넘겨주었다.
redirect할 guest_view는 guest_no를 받을 수 있다.
// parameter에 guest_no가 존재하지 않으면
@GetMapping(value = "/guest_view", params = "!guest_no")
public String guest_view() throws Exception {
return "redirect:guest_main";
}
//parameter에 guest_no가 존재하면
@GetMapping(value="/guest_view", params="guest_no")
public String guest_view(@RequestParam int guest_no, Model model) throws Exception {
Guest guest = guestService.selectByNo(guest_no);
if(guest==null) {
model.addAttribute("GUEST_NOT_FOUND_MSG","게시물이 존재하지 않습니다.");
return "guest_view_not_found";
}
model.addAttribute("guest",guest);
return "guest_view";
}
guest_view로 넘어올때 guest_no가 필요하기 때문에
guest_no가 있는 경우와 없는 경우를 나누어 맵핑해준다.
이전까진 @GetMapping("/guest_view") 로 value값만 넣어줘서 value=를 명시하지 않았지만
params 속성도 넣어야 하기 때문에 value=를 명시해준다.
params Get방식으로 넘어 올때 필요한 param들을 지정해주는데
!연산자를 이용해 존재하지 않는 경우와 존재하는 경우를 표현할 수 있다.
@GetMapping(value={"/user_write_action","/user_login_action",
"/user_logout_action","/user_modify_form",
"/user_modify_action","/user_remove_action"})
public String get_mapping() {
return "redirect:user_main";
}
매핑할때 value=은 배열로 받기 때문에 값을 여러개 줄 수 있다.
->PostMapping하고 GetMapping을 막을 때 GetMapping으로 들어오는 요청들을 다 main페이지로 redirection시켰다.
'Java > Spring Boot' 카테고리의 다른 글
| Spring Boot DataSource 설정 (0) | 2023.09.13 |
|---|---|
| Java WebAppInitConfig (0) | 2023.09.13 |
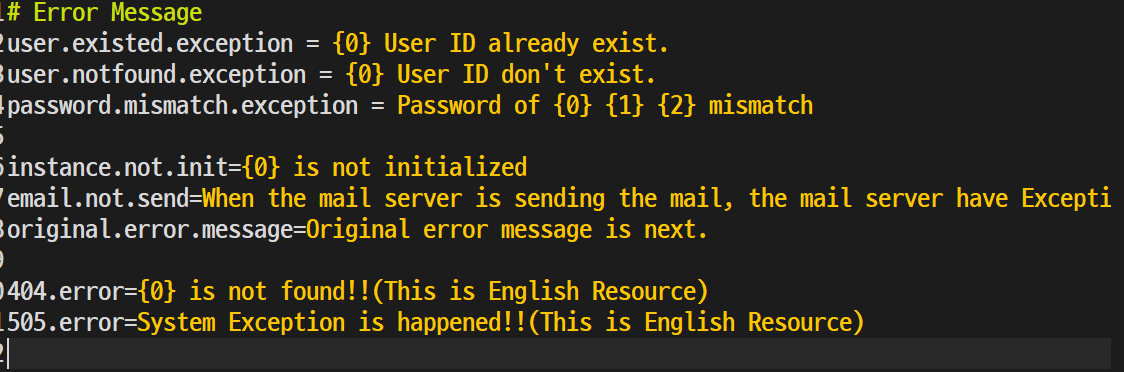
| Spring JSP 국제화 (0) | 2023.09.13 |
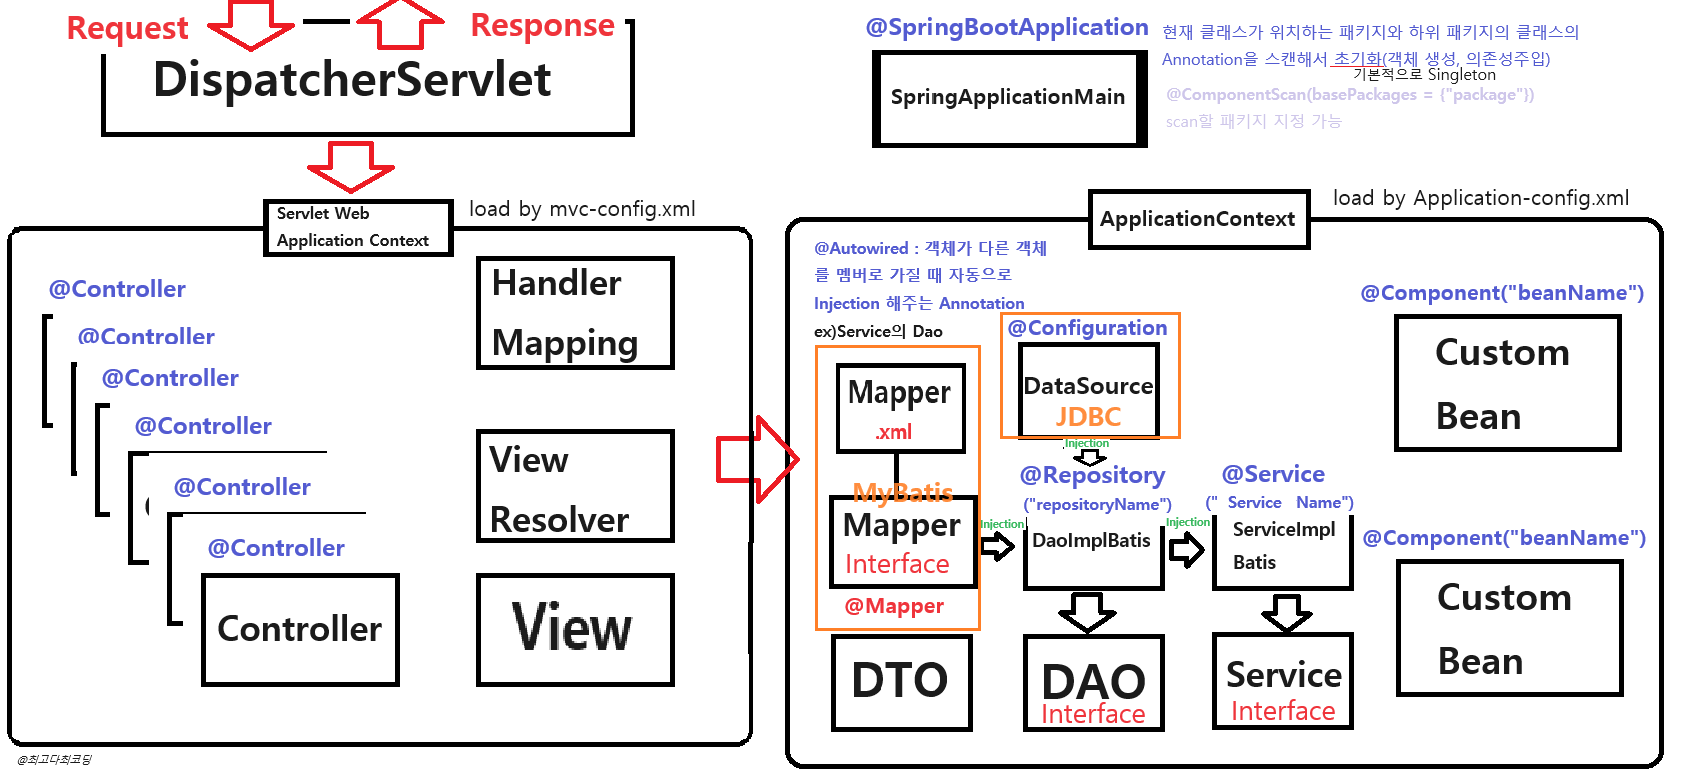
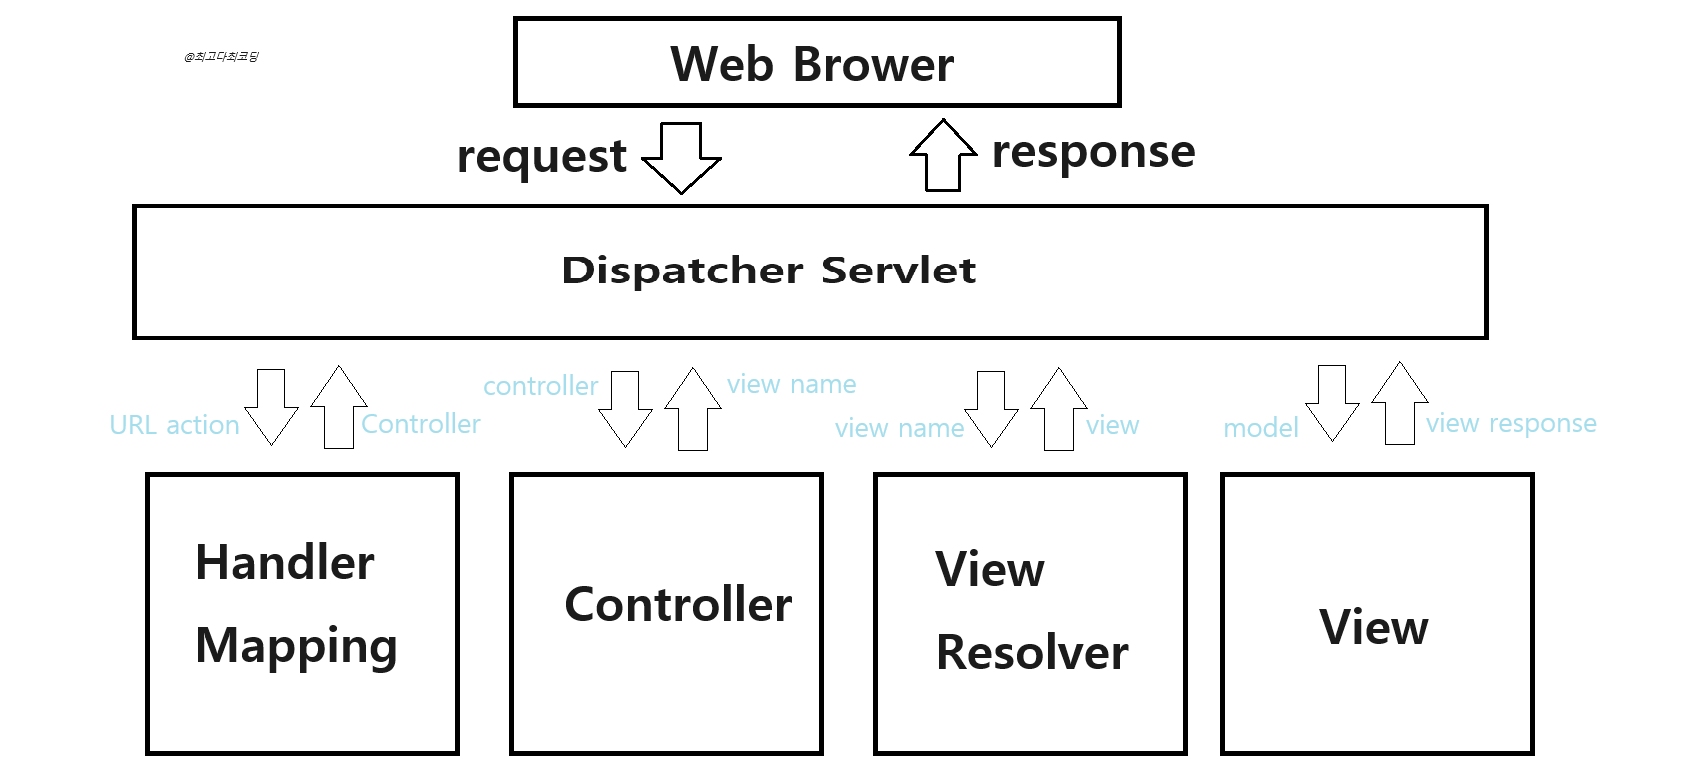
| Spring Boot Controller Mapping + View Resolver (0) | 2023.09.12 |
| Spring Boot Exception Handler (0) | 2023.09.12 |